1. Equipment pickup
1. What this process is for
This process hands a device from the front desk to whoever is going to use it, with no paper queue and nobody writing anything down. People who need a laptop, a tablet or a power strip identify themselves with their enrollment number on the tablet at the counter, choose what they are taking and walk away with the device.
When it ends, each chosen item is recorded in that person's name and stops being offered to anybody else.
2. Before you start
- The tablet on the counter is on, with the portal open.
- The enrollment number is registered in the system.
- The record is active — an inactive record gets into the portal but cannot pick anything up (see the rule below).
- The category you want has at least one free unit.
- The device is physically on the counter.
3. Terms used on this page
Terms that cross several processes live in the general glossary: enrollment number, asset tag, category, loan and inactive record.
These three belong to this page only — they are the parts of the screen that the steps name:
| Term | What it is |
|---|---|
| Category grid | The large cards on the opening screen, one per category, each with a count of free units. |
| Selection | The items already tapped and not yet confirmed. Nothing is recorded while an item is only here. |
| Selection bar | The fixed strip at the bottom that lists the selection and holds the Confirmar retirada (Confirm pickup) button. |
4. Who does what
| Role | Does | Does not |
|---|---|---|
| Student or teacher | Types the enrollment number, chooses the items, confirms the pickup and takes the devices from the counter. | Does not choose which unit is free — the portal only offers the ones that are. |
| Portal (the tablet) | Checks the record, shows what is free at the moment of the tap and records one loan per item. | Does not keep a session: the identification lasts for one visit and ends with it. |
| Front desk | Keeps the inventory up to date and leaves the devices on the counter. | Takes no part in the pickup. Confirms nothing, and does not need to be there for a pickup to happen. |
5. BPMN diagram
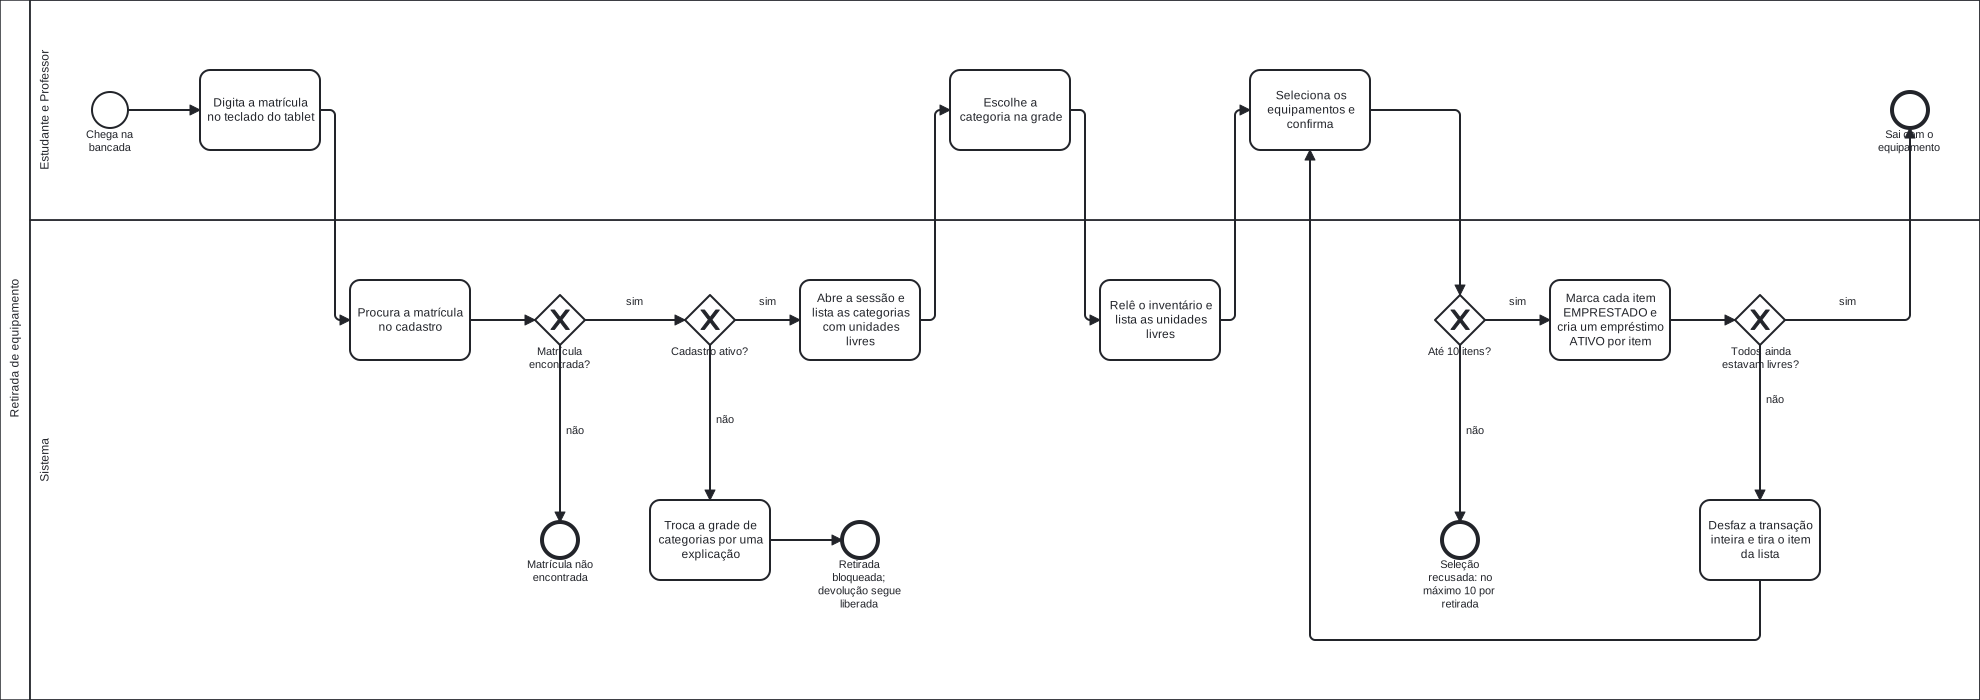
Click the diagram to open it at full size — at the width of this page it fits at a little over a third of its size, and the labels cannot be read.
The diagram labels are in Portuguese, because it is the same file the Portuguese pages use: a second English copy of every diagram would double the maintenance surface of the artifact that changes the least.
The diagram labels, in English
| Label on the diagram | In English |
|---|---|
| Estudante e Professor | Student and teacher (the lane) |
| Sistema | System (the lane) |
| Chega na bancada | Arrives at the counter |
| Digita a matrícula no teclado do tablet | Types the enrollment number on the tablet keypad |
| Procura a matrícula no cadastro | Looks the enrollment number up in the records |
| Matrícula encontrada? | Enrollment number found? |
| Matrícula não encontrada | Enrollment number not found |
| Cadastro ativo? | Is the record active? |
| Troca a grade de categorias por uma explicação | Replaces the category grid with an explanation |
| Retirada bloqueada; devolução segue liberada | Pickup blocked; returns stay allowed |
| Abre a sessão e lista as categorias com unidades livres | Opens the session and lists the categories with free units |
| Escolhe a categoria na grade | Chooses the category on the grid |
| Relê o inventário e lista as unidades livres | Re-reads the inventory and lists the free units |
| Seleciona os equipamentos e confirma | Selects the devices and confirms |
| Até 10 itens? | Up to 10 items? |
| Seleção recusada: no máximo 10 por retirada | Selection refused: 10 items per pickup at most |
| Marca cada item EMPRESTADO e cria um empréstimo ATIVO por item | Marks each item EMPRESTADO (on loan) and creates one ATIVO (active) loan per item |
| Todos ainda estavam livres? | Were they all still free? |
| Desfaz a transação inteira e tira o item da lista | Rolls the whole transaction back and removes the item from the list |
| Sai com o equipamento | Leaves with the equipment |
| sim / não | yes / no |
Download the .bpmn file — the source
of the diagram, which opens in bpmn.io with nothing to
install.
6. Step by step
The screen goes back to the start on its own
After two minutes with no touch, the portal ends the session and returns to the enrollment number screen. The tablet stays on the counter and belongs to everybody: a forgotten open session is the next person picking equipment up in the name of whoever left. If that happens halfway through, start again from step 1 — nothing that was only in the selection has been recorded.
-
Type your enrollment number on the on-screen keypad.
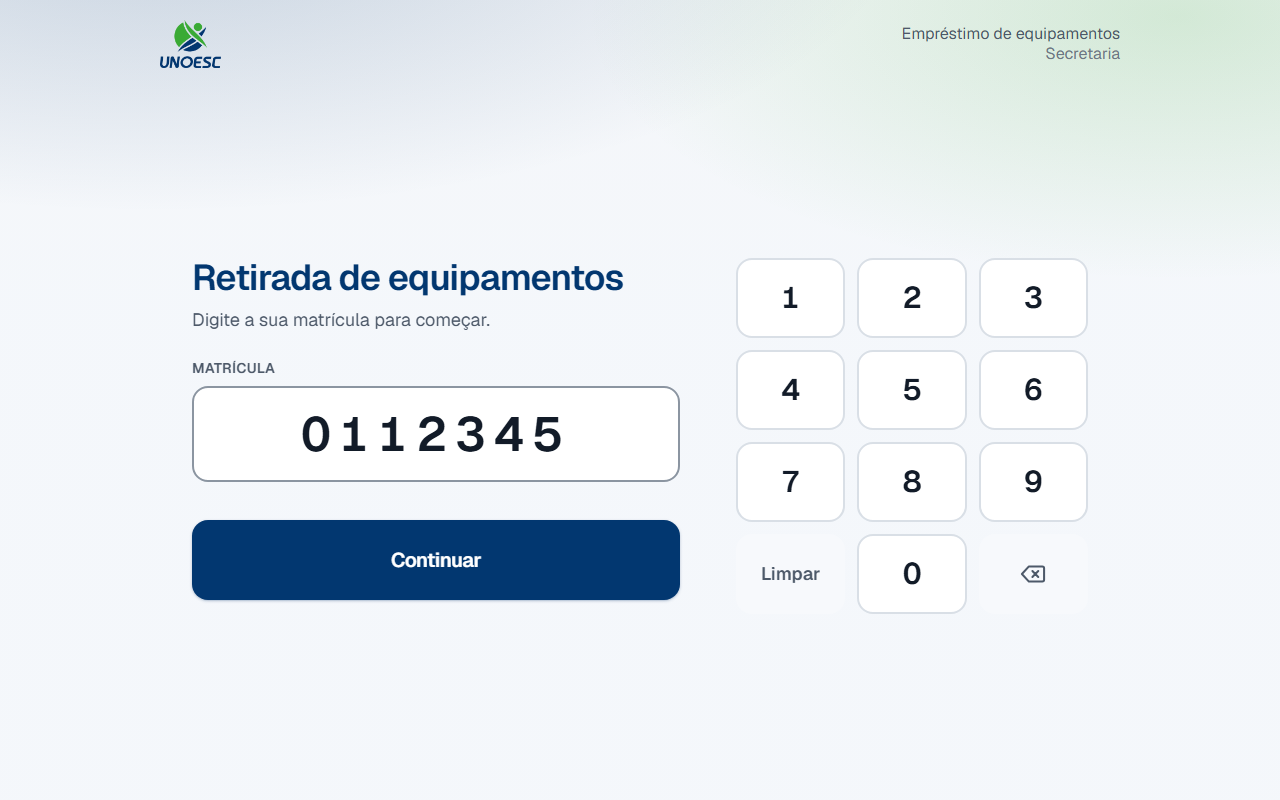
Type every digit, leading zeros included:
0012345and12345are different enrollment numbers. To delete the last digit, tap the backspace key; to clear everything, tap Limpar (Clear). -
Tap Continuar (Continue).
-
Is the enrollment number registered?
- If YES → your name, profile and enrollment number appear in the top right corner. Check them: if the name is not yours, tap Sair (Exit) and type the enrollment number again. Go to step 4.
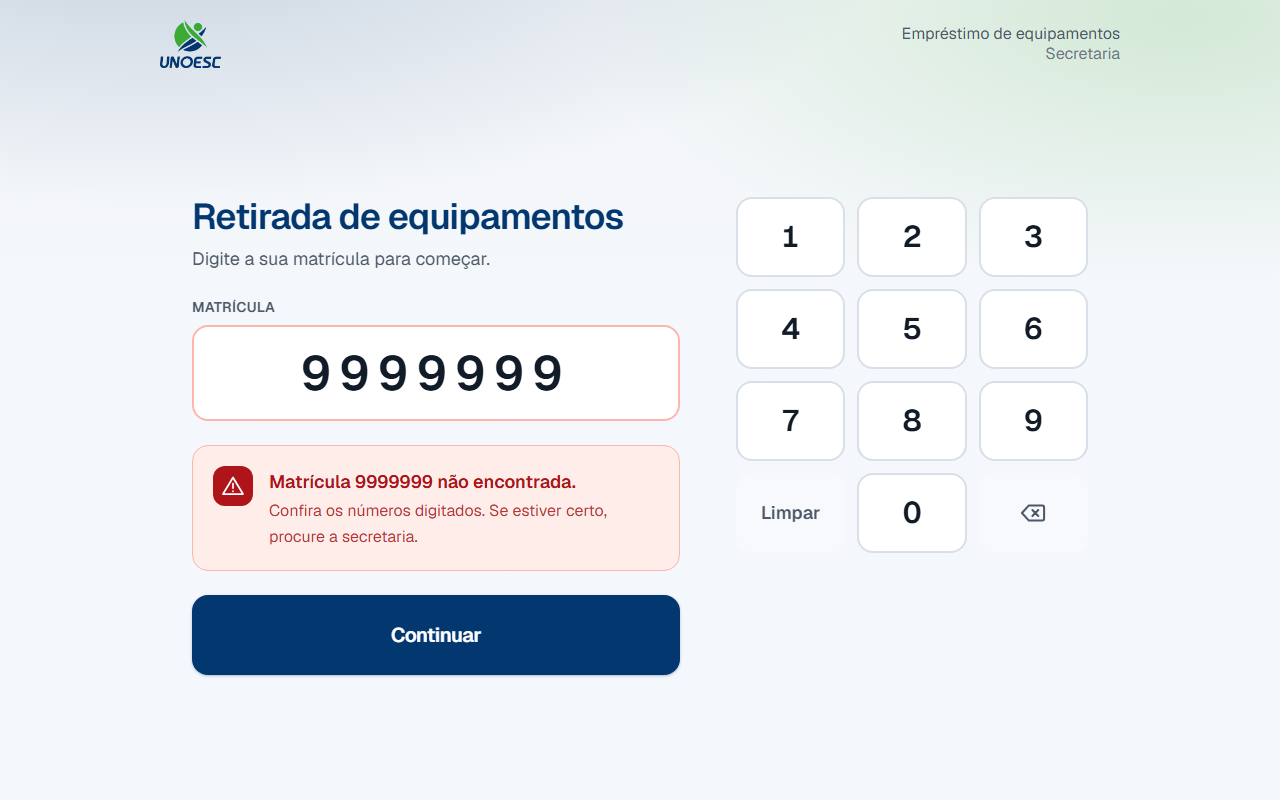
- If NO → the screen stays on the enrollment number and shows "Matrícula 9999999 não encontrada." (Enrollment number 9999999 not found.) Check the digits and type them again. If they are right, ask the front desk.
-
Is your record active?
- If YES → the category grid appears. Go to step 5.
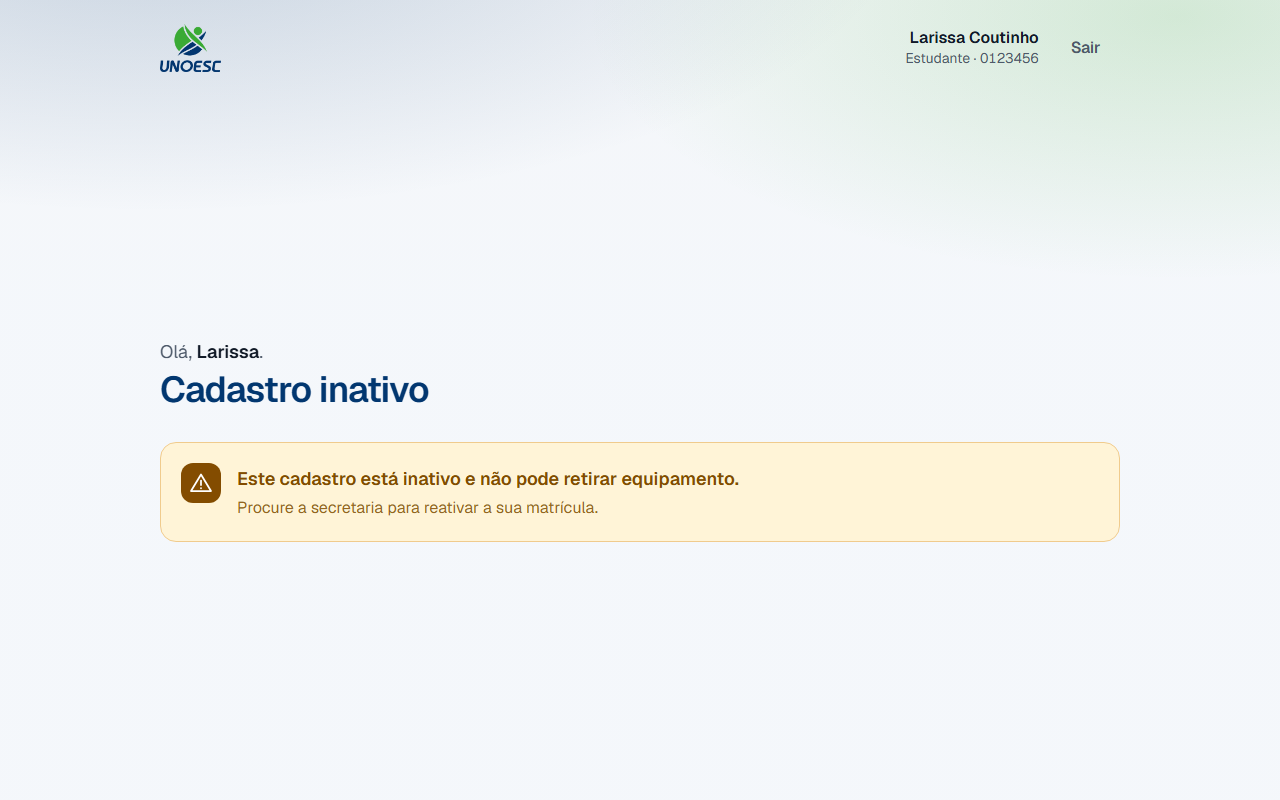
- If NO → where the grid should be you get "Este cadastro está inativo e não pode retirar equipamento." (This record is inactive and cannot pick equipment up.) Ask the front desk to reactivate the enrollment number. If you are holding a device, returning it is still allowed.
-
Are you already holding a device?
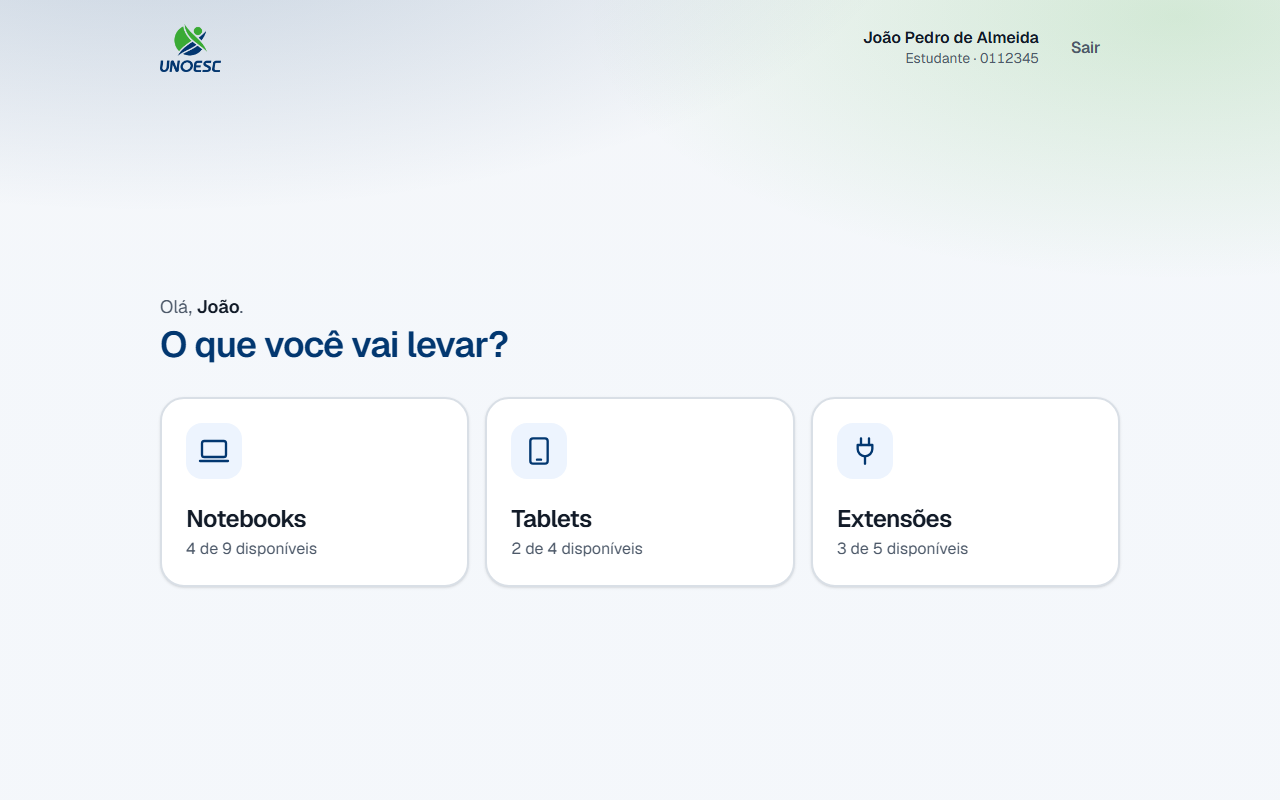
- If NO → the heading reads "O que você vai levar?" (What are you taking?) and the category grid has the screen to itself. That is the screen in the step 6 picture. Go to step 6.
- If YES → the heading reads "O que você quer fazer?" (What do you want to do?), the Meus equipamentos (My equipment) section comes in with what is already in your name, and the grid shares the screen with it — to the right on a landscape tablet, below it on a portrait one, under the heading Retirar equipamento (Pick equipment up). It is the same grid, and the pickup works the same: go to step 6.
You do not have to return anything to pick up one more device. The list on the left is the return process, and it does not get in the way of a pickup.
-
Look at the card of the category you want. Each one says how many units are free right now — "4 de 9 disponíveis" (4 of 9 available) means the front desk has nine laptops in circulation and four of them are on the counter at this moment.
-
Does the category have any free unit?
- If YES → tap the card. Go to step 8.
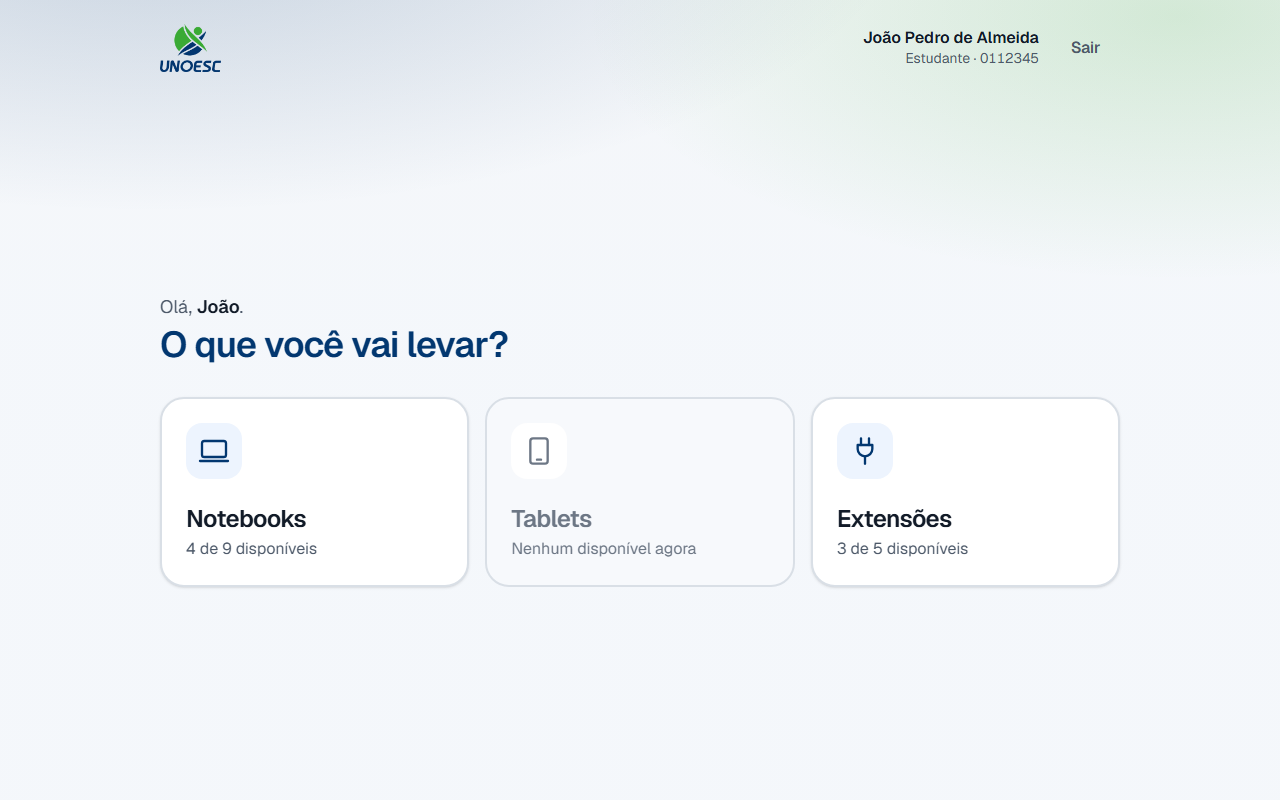
- If NO → the card turns gray, says "Nenhum disponível agora" (None available right now) and does not respond to the tap. Choose another category, or talk to the front desk.
-
Tap the asset tag of each item you are taking.
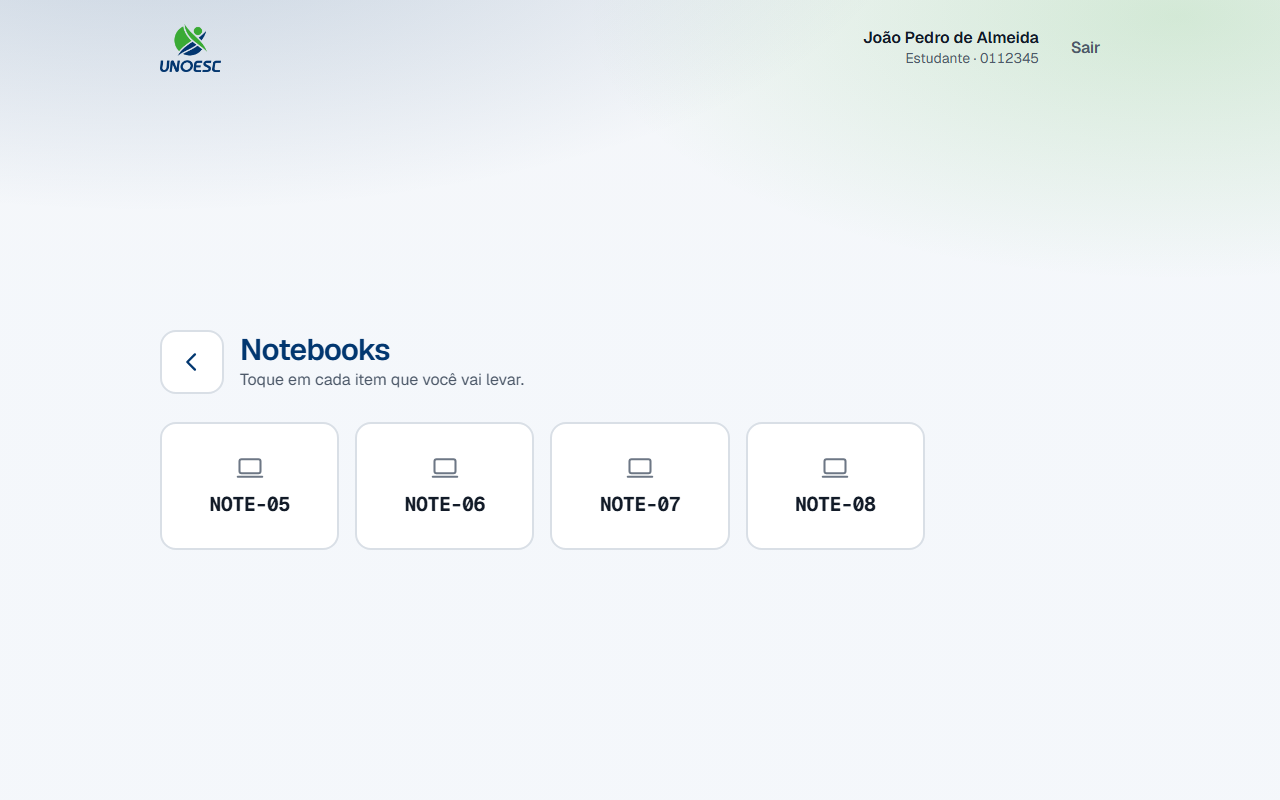
The item you tap turns green, with a check mark in the corner. The asset tag on screen is the same one stuck on the device, character by character.
-
Check the bar at the bottom: it lists everything that is selected.
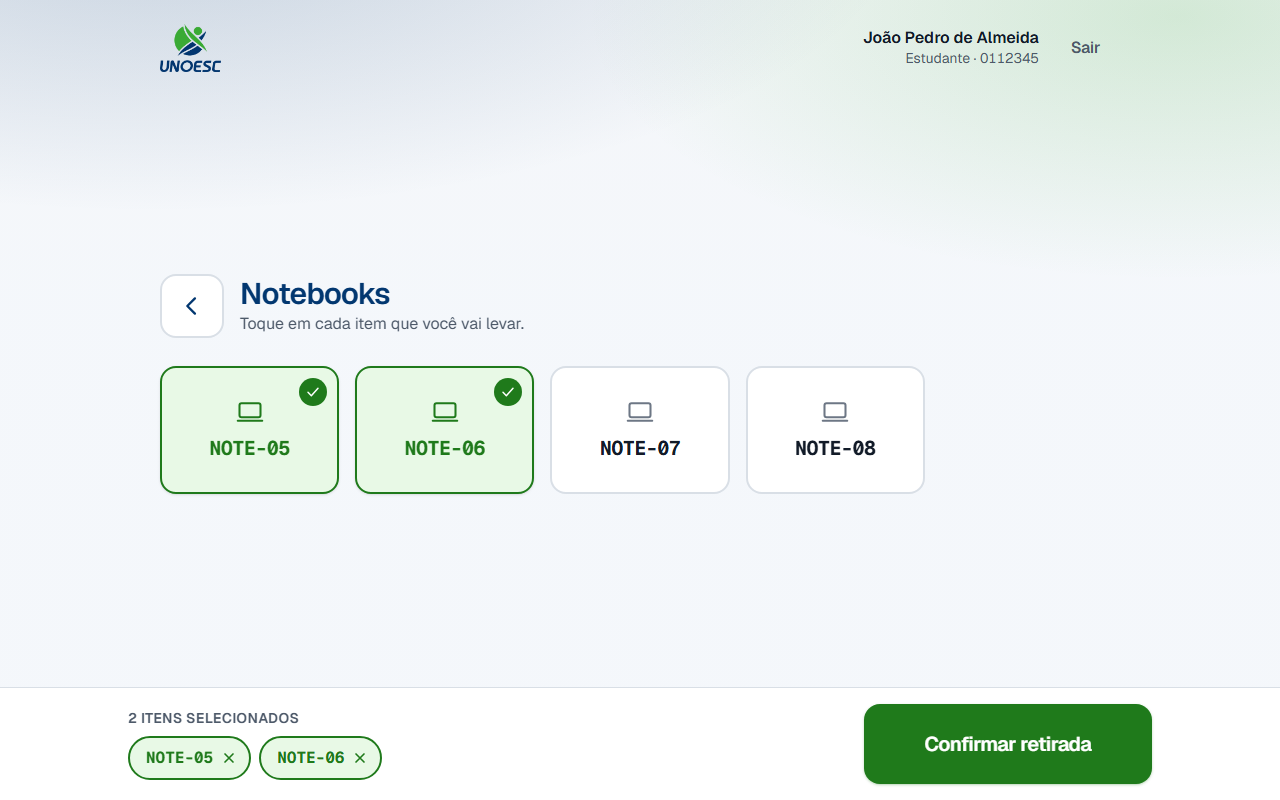
Tapped the wrong item?
Tap it again to deselect it, or tap the × next to the asset tag on the bottom bar. While the item is only in the selection, nothing has been recorded.
The selection follows you between categories: you can go back with the arrow in the top left corner, enter another category and take everything in a single confirmation.
-
Tap Confirmar retirada (Confirm pickup).
-
Were all the selected items still free?
- If YES → the pickup confirmed screen appears. Go to step 12.
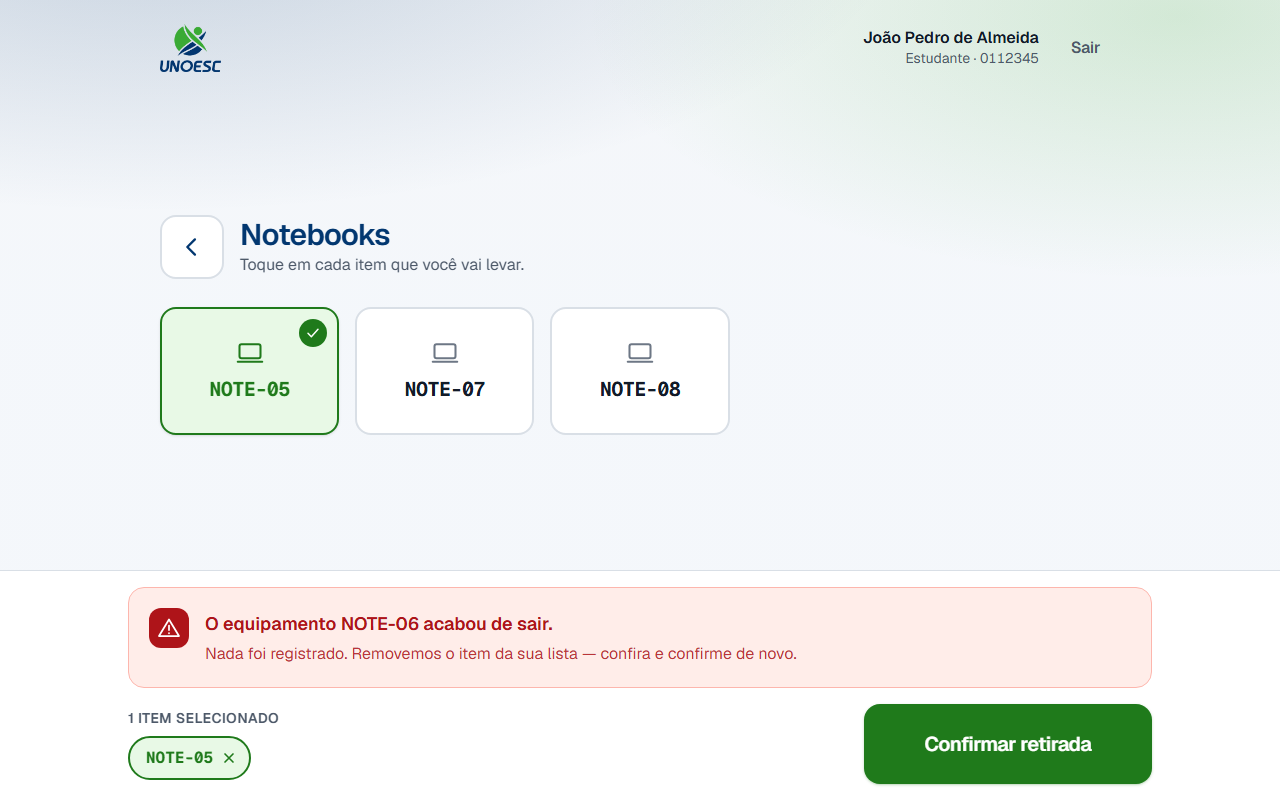
- If NO → the bar shows which item is gone — for example "O equipamento NOTE-06 acabou de sair." (Device NOTE-06 has just left.) — and the portal removes that item from your list. Nothing was recorded, not even the items that were still free. Check what is left and tap Confirmar retirada (Confirm pickup) again.
-
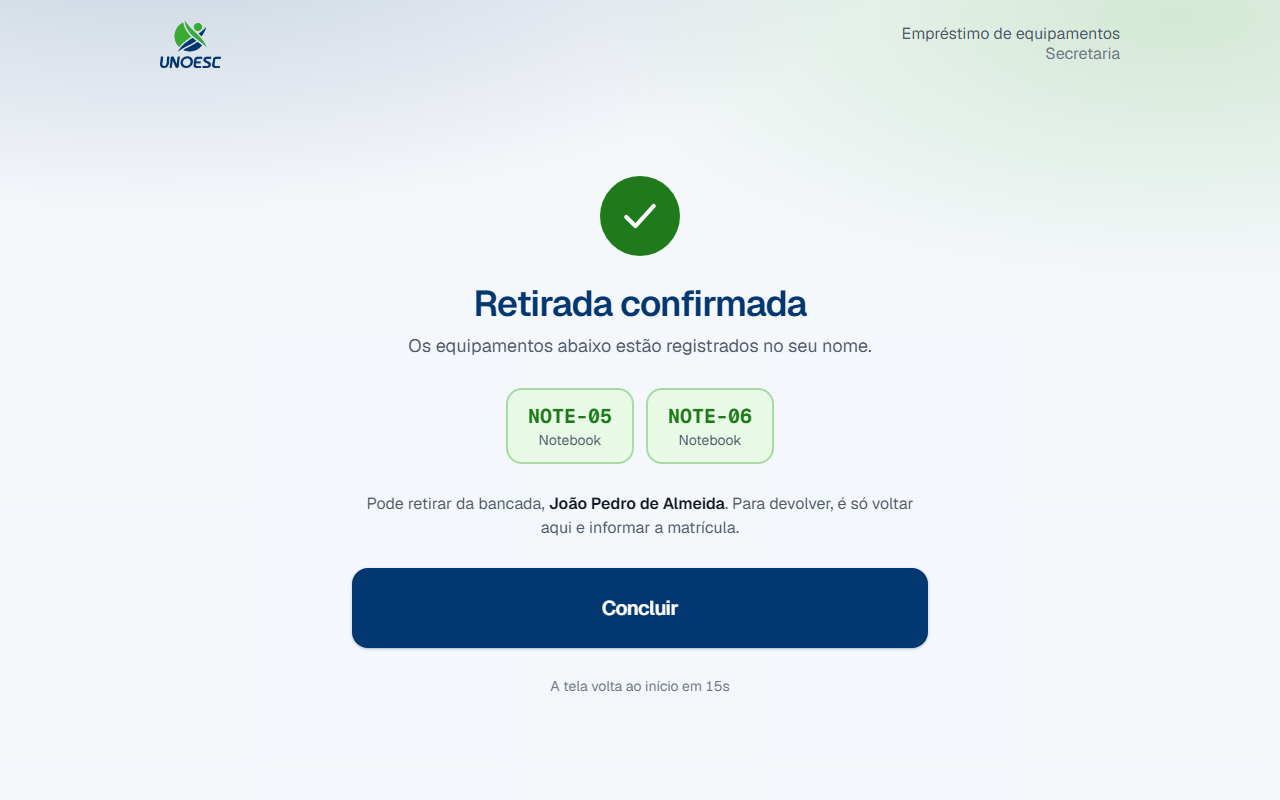
Take from the counter the devices shown on screen, checking each asset tag.
-
Tap Concluir (Finish).
If you walk away without tapping it, the screen goes back to the start on its own, on the countdown shown at the bottom. The pickup is recorded either way.
7. Rules that are not obvious
I took three items at once. Is that one loan or three?
It is three, one per device — even though you confirmed only once.
That is what lets you return a laptop on Tuesday and keep the power strip until Friday. If the three were a single record, returning one would force you to return them all, and the front desk would have no way of knowing which device was already back.
You see this in practice on the return: each item appears on a row of its own, with its own button.
Why can I get in but not pick anything up?
Because your record is inactive, and that block works in one direction only: it stops pickups and allows returns.
The asymmetry is deliberate. People who are deactivated — enrollment suspended, graduated, left the institution — nearly always have a device in their bag. If the portal blocked both directions, deactivating somebody would guarantee that their device never comes back to the cabinet. So an inactive enrollment number gets in as usual, and the only thing that changes is the category grid, which gives way to the explanation.
To pick equipment up again, ask the front desk.
Why does the asset tag always appear as NOTE-01, never shortened?
Because it has to match the sticker on the device character by character. That is why it appears in full, in a monospaced font, and never turns into "Notebook 1" or "Note-1" anywhere on screen.
Somebody standing at the counter with four identical laptops in front of them has only the asset tag to tell one from another. Any "improvement" in the way it is written becomes, at the counter, a comparison that does not add up.
I confirmed and took the wrong device. How do I undo it?
There is no way to undo a pickup from the tablet — once confirmed, the items are in your name.
The way out is the next process: go back to the portal, enter your enrollment number and return the item you are not going to use, leaving it on the counter. It is only offered to somebody else after the front desk collects it.
8. Common errors and what to do
| Message on screen | Cause | What to do |
|---|---|---|
| "Matrícula 9999999 não encontrada." (Enrollment number 9999999 not found.) | A wrong digit, a missing leading zero, or a record that was never imported. | Check the digits and type them again. If they are right, ask the front desk. |
| "Este cadastro está inativo e não pode retirar equipamento." (This record is inactive and cannot pick equipment up.) | The record is out of circulation. | Ask the front desk to reactivate it. Returning what you already have stays allowed. |
| "Nenhuma unidade de Tablet está livre agora." (No Tablet unit is free right now.) | The last unit of the category left between your entering the portal and your tapping the card. | Go back with the arrow in the top left corner and choose another category. |
| "O equipamento NOTE-06 acabou de sair." (Device NOTE-06 has just left.) | Somebody else confirmed the pickup of that same device before you. | Nothing was recorded. The item has already left your list: check what is left and confirm again. |
| "São no máximo 10 itens por retirada." (10 items per pickup at most.) | The selection went over the ten-item ceiling. | Take items out of the selection until ten are left. To take more than that, talk to the front desk. |